
Laser Cutting on veneer
Posted: December 1, 2016 Filed under: Subject Leave a commentI have managed to cut 3 of my designs onto veneer, However I did have to cut a few corners whilst doing to save time, which at this point I didn’t have too much left.
My original plan was to cut straight onto veneer so that i could achieve the same thickness and detail as my card tester pieces, however to do this I would have to straighten out the veneer I had, to do this I would of had to dampen the veneer and way it down to lay flat for three days, however I didn’t have 3 days to be able to wait for the veneer to flatten using this technique, and so the other alternative was to back the veneer with MDF so that it would hold its shape whilst being cut and displayed.
To do this I took a 3mm piece of MDF (the thinnest they had available) and laid it onto my rolled out veneer, I then cut out around the MDF allowing 10mm border for mistakes. once the veneer was cut, I then laid the MDF onto a flat work surface, and evenly layered wood glue using an old card I had in my purse, I then stuck the veneer to the surface and weighed it down to dry for an hour.
Doing it this way saved me a lot of time, it also meant that I could get my pieces cut on the same day rather than delay it for another 2, sadly there was also downsides to using this time-saving technique, a lot of the finer details in my design burned away, due to the MDF backing, where as if I was cutting into the veneer alone the finer detail would of worked, even with this issue of loosing some of the finer detail in my scenes I was incredibly happy with the outcome, the veneer didn’t bubble or rise with the glue, and the pieces layered and fitten intot he frames really well.
However to take this further for exhibition I will allow time within my timeline to flatten out the veneers properly so that I can achieve the same fine detail cut that I had with my card pieces.
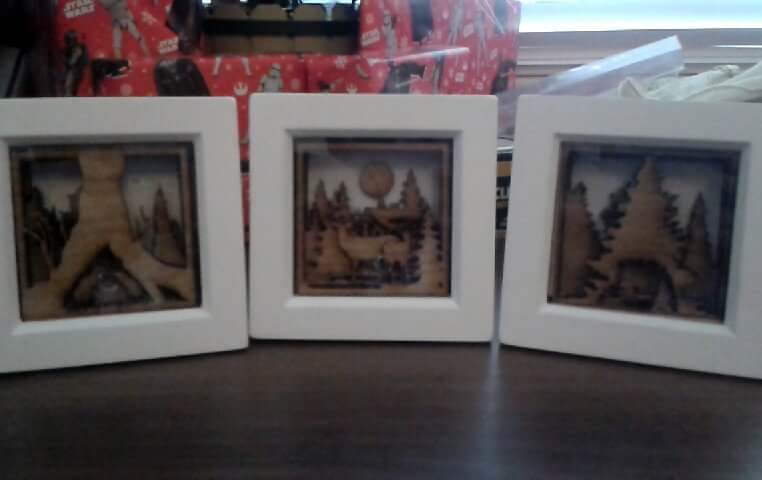
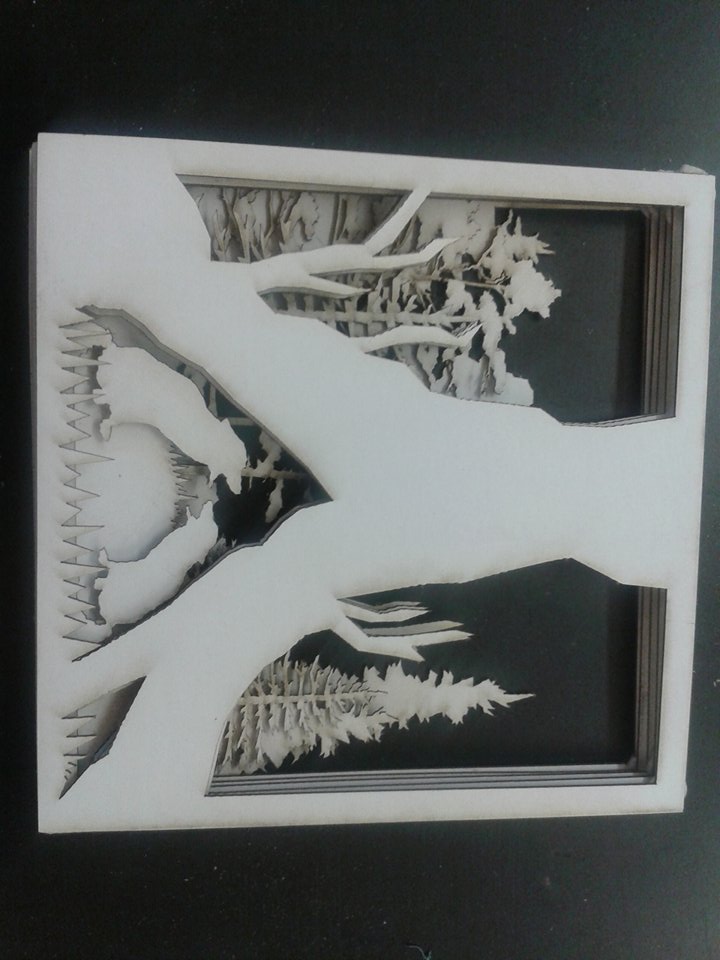
Above is pictured 3 of my finished design pieces, fitted into small box frames, the size of these pieces is 750mm by 750mm, so they are on a smaller scale than my tester pieces, I am happy with the outcome and how they turned out as I had to decrease the size slightly for the frames, event hought this altered some of the designs ever so slightly, due to some fine detail being lost, it wasn’t a major set back.
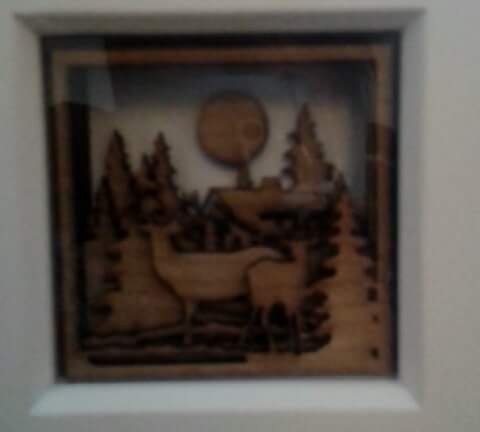
This is a close up of one of the designs, you can see int he closeup that I have decided not to sand the pieces and leave the slight burns from the laser cutter on the pieces, I did this because I think it shows the technique used behind the piece.

In this design some of the finer detail in some o the trees was lost, however as the pieces are layered it is difficult to notice.

This design I was really worried about specially as I had to reduce the scale, this meant the reindeer inside the tree was incredibly small detail, however the piece still cut fine apart, from the male deers antlers which burnt up due to them being so fine, however this did not effect the overall design, its just the male deer is no a female deer.
Photos from around Roath Park
Posted: November 26, 2016 Filed under: Subject Leave a commentSadly I didn’t get to take as many photos as I would of liked too, due to cold affecting me with my back pain and asthma, also that my battery on camera run out, and I forgot to bring spares.
However I was happy with some of the photos that I did manage to get whilst walking around the park area, specially one with the bridge and the trees surrounding it, from the photos I will make simplified drawings which I can then work out layers for a new design. I want to create some designs from places round Cardiff, as I think it make the pieces more real and relate able, rather than me creating random nature related designs from thin air.


Above are some of my favourite images from the ones that I took round the park, I will redraw these images and simplify them down so that the details are taken away and we are left with the basic shape or silhouette. From my drawings I can then break them down into layers, I will do this using coral draw software, so that they can be printed onto card to see if the layers fit and work well.
Developing New Scene Designs
Posted: November 23, 2016 Filed under: Subject Leave a commentTo gather more ideas for designs for my layered pieces, I wanted to go out into Roath park, which is opposite where I live, I wated to do this because walking round the park it always provided beautiful views, I thought it be interesting to create some layered pieces from nature local to Cardiff. However due to the unfortunate weather I haven’t been able to do this just yet, as going out int he heavy rain/wind wouldn’t be too good for my health, however as the weather seems to be drying up I will be heading over very soon.
I am hoping the photographs I will take around the park, will provide me with inspiration for new layered design pieces, one I am interested in doing is of the bridge overlapping the river with trees behind, also maybe one from the elevated wooden sitting area over the lake.
Laser Cut Designs
Posted: November 23, 2016 Filed under: Subject Leave a commentSo when doing my first laser cut design which was the peacock for the pitch, I was thrown a bit of a curve ball, when I found out that the Coral Draw software I use and familiar with, is no longer used on the systems with the laser cutter, it has since been updated to Adobe Illustrator, this really threw me off track as I have no knowledge or familiarity with the software at all, but thankfully after speaking with a few lovely guys from the fab lab, I was told I can still use the Coral Draw software and just export the file to adobe after to print.
I was thankful of this as even though I am willing and want to learn the new software doing so at the moment would of been costly to my timescale for this project, and so it will be something I will most definitely look into learning for future.
I worked on various designs using Coral Draw, trying to include more layers to give more depth and effect to my pieces, to see how the layers work, I first cut out the designs in card, this method allowed me to see how the pieces fitted together and whether some of the layers, didn’t fit. once I felt comfortable and happy with my design I then carried it across onto 3mm MDF, this allowed me to see how the piece worked in wood, and whether the scale onto wood would work.

This picture shows the laser cutter in process of cutting out one of my designs into card.

This the finished design after all pieces on the laser cutter was completed and layered up, I was happy with how the pieces fitted together and thought that the layers worked well and so, I then carried across the design onto wood.
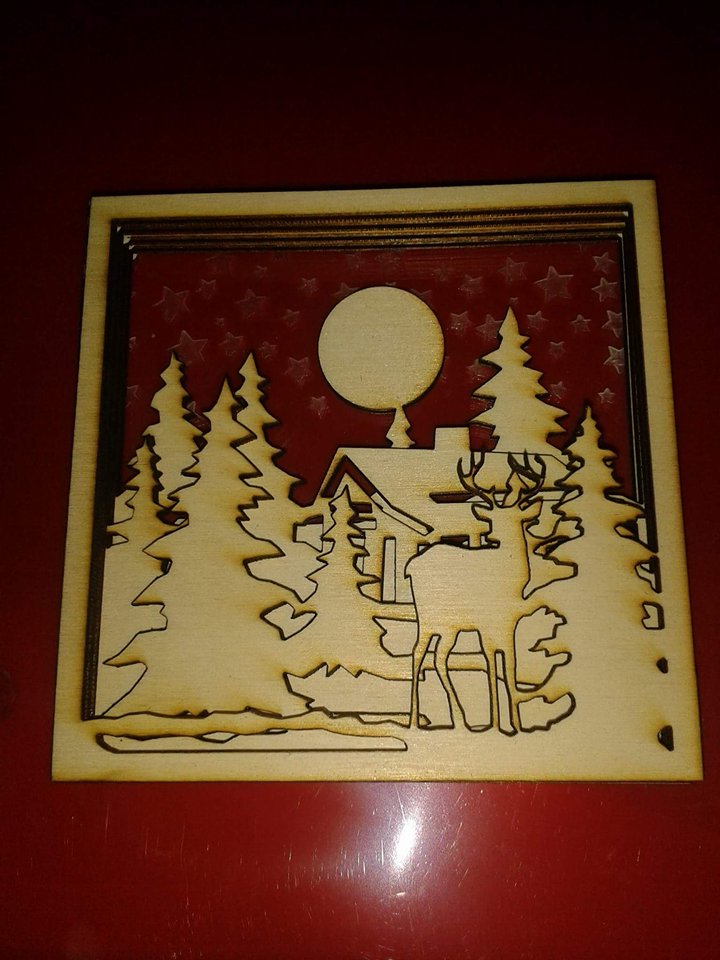
I carried the same design across and cut it into 3mm MDF, the design still worked well and looked effective, I played round with the acrylic in the back and engraved small stars to create a night time scene, I was able to test how this would look with light as a peer had led strip lighting on hand, when I lit this piece the engraved starts glowed and gave a great effect.

I admit I was feeling a bit christmassy when doing this design, and I think that comes across, however I did enjoy breaking away from the simple box shape and trying something different, however due to the scale i printed this in which was about 300mm tall and just slight under wide, the detail on the deers was tiny and I was impressed that it cut successfully, but the real test would be when cutting into the wood.

I was pleasantly surprised that the design cut successfully into wood, with the exception that the antlers are incredibly fine, I was happy with the outcome, as you can see int he image i also replicated the stars in the background as I loved the glowing effect they gave when the piece was lit.
This was the most recent design I done, I included more layers into this piece than I have done in the previous ones, and I am pretty pleased with the outcome of the piece, I have yet to cut this design into wood, however Im hoping to get my veneers soon to be able to get some designs done using them.

Here are all the pieces together in the glass cabinet for the material process task. In this photo you can sort of see the scale that these pieces are on, it is on the smaller side, however I rather like the small scale of the pieces and unsure of whether I really want to take them any bigger, I think that the small scale adds to the appeal of the pieces as to me it makes them more precious.
Following the Pitch
Posted: October 23, 2016 Filed under: Subject Leave a commentI found the pitch very helpful, showing my ideas and drafts in front of my peers and gaining valuable feedback changed some of my views, at first I wanted to create a series of lamps, with interchangeable pieces so that the user can change the scene and so change the design of the lamp themselves, I also wanted to try aiming some towards younger viewers,however on presenting these ideas along in my pitch, it was suggested that maybe aiming towards a younger audience may not work with my material choice, after discussing this I could understand their explanation, as using a high quality costly material such as veneers, wouldn’t be well suited towards children, so it was suggested that I stick to a older audience, where the material would work and be appreciated.
Also it was suggested that i stick to wall hangings and simple designs for now rather than the lamps and interchangeable scene pieces, even though this idea was liked and found interesting, I was told it could be a bit much to do in a short time scale, once thinking of this myself I agreed that at first, doing simpler but effective wall hanging pieces would fit better into the timescale I had available, however the idea would be interesting to press on further on in the future. From the designs I brought in to the pitch it was evident that I liked the forms and look of nature and natural scenes, and so this would be the focus of my pieces.
Another hand cut layered scene, I added more layers to this one than the previous hand cut, and kept to a simpler design however i still found it difficult to cut due to the issues with my hands and so I carried on my other designs on the laser cutter.

This is one of my mock up designs cut into card using the laser cutter, due to it being a quick mock up the design itself, wasn’t thought out as clearly as it should of been and so the feathers doesn’t sit naturally and flow with the piece, However through this mock up piece I gained an idea how how small I can make the pieces and still keep the detail that I want which was intriguing as I found I preferred the pieces on a smaller scale than i did the larger, as I feel it makes the pieces more precious.
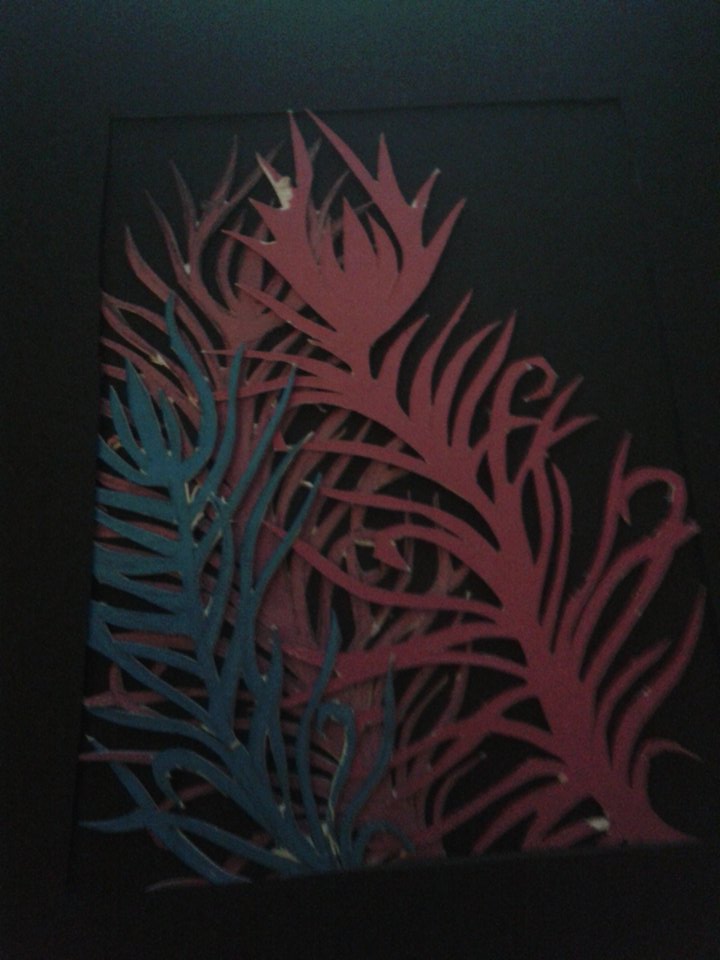
This is from some of the work I took into the pitch, This is a layered sample piece of hand cut peacock feathers, as you can see the quality wasn’t of a good standard, due to having problems with my hands/wrists it became painful for me applying pressure to cut the pieces out.
Looking further into artists
So following after the pitch I decided to look further into some of the artists, such as Martin Tomsky, who is a London based artist who creates Illustrative relief pieces built up using laser cut stained plywood, his pieces range in size and shape from small items of jewellery to much larger bespoke artworks.
I have been using veneer for my smaller pieces, however I wasn’t aware that Martin used ply as I also thought veneer was used for his work, as part of my proposal was to to create some bigger pieces for my exhibition, as well as the possibility to make movable and interchangeable pieces, at first using veneer in this larger quantity worried me as the price was far out of my range, however If I can achieve the same effect from stained ply is does mean I can move on to making bigger pieces for my exhibition, also as ply is flexible it will also allow me to play around with shape and form more, trying more curved designs as a possibility.
Subject Pitch
Posted: October 18, 2016 Filed under: Subject Leave a commentWe had to set up a pitch/presentation, this was to put our ideas across for the pieces we want to make, and materials and processes we may use, I had a clear idea that I definitely wanted to go into laser cutting but using the skills of layering to build up and create 3d scenes, to push it further I also wanted to include lighting into these pieces to create 3d scenic lamps or wall hangings.
Looking into materials I wanted to use, after a tutorial with Ingrid, and showing her the artists I was looking into, we came to the conclusion that Veneers would be a good material to use, due to the amount of colours and shades it comes in as well, as the professional finish it gives, also due to the flexibility of the material it will allow me to play with shape and form of my pieces. Veneers come in many different types of wood, using the darker shades for the back layers and lighter shades towards the front of the piece will give my scenes more depth.
When I was looking into ideas for lighting I could possibly use, I decided to go for something I used for a previous project int he past, which was led strip lighting, I decided this would be the ideal type of lighting to use, due to its ability to be cut down to any side needed also due to the flexibility of the light strip itself, it can be formed round any shape and hidden easily.
The light strips can be bought in plain white colour, or in RGB which can change colour via remote, I decided to go with the white for now, as it is more accessible and easier to work with and connect for a starter, then if wanted I can then progress to the coloured leds, which will allow the user to change the colour of the light as they please, this could be interested to take further in future, as I understand from previous lectures in the past, that coloured lighting can have effect on a users emotions and feelings.
Subject Brief
Posted: September 28, 2016 Filed under: Subject Leave a commentAfter last year and overthinking this brief which lead to confusion and struggles for myself, I wanted to go into this brief with a clear head, I looked at work I done in my previous years on this course, and found that my laser cut work is what really stood out to me, and so I knew I wanted to carry this on and develop further to better and broaden my skills with this.
The summer project, I admit I found rather difficult, I wasn’t aware of it until I returned to uni for the term, as through summer I was awaiting response for allowance to resit and so my attention was focused on that, due to this my petcha kutcha presentation was last minute, the task was to find your ideal object, I found this rather difficult, however I knew I loved objects and pieces with intricate detail, that you had to really look close to see it all, I also loved pieces that used lighting, the main images in my presentation that stood out to me was the work of Martin Tomsky, who layers laser cut wood pieces to create built up 3D scenes, and so I wanted to try this skill myself.
